Saturday, 15 December 2012

xmllint : Command line XML parser and formatter

So you were given a XML file that came straight out of a windows system with no indentation and incorrect line endings. The simplest way out is xmllint.

The program does much more than formatting its input. Additional functions include: parsing, verifying, dropping empty nodes and many more.

Installing it on CentOS, Fedora and like, is performed via :

sudo yum -y install libxml2

openSUSE users may use yast or type something like:

zypper install libxml2

... while Debian and Ubuntu users will have to go like:

sudo apt-get install libxml2-utils

after you have it on your system, the easy way to fix the badly formated xml file would be :

xmllint --format badlyFormated.xml > wellFormated.xml

Thursday, 13 December 2012

Gnome2 Default Keyring location

Just a quick note for me -- and anyone else out there -- The location of the keyring in gnome2 is in ~/gnome2/keyrings. And if you forget your keyring password then the easy way to start all over with a new keyring is:

rm ~/.gnome2/keyrings/default.keyring 

Thursday, 6 December 2012

Using a raspberrypi as a file server

The idea came to me from a friend. I wanted to install a small network storage system to use merely as a file exchange repository at the office and I was looking to buy some kind of Ethernet disk, when he said to me why don't you do it with a raspberry and a USB flash drive?. The thought was intriguing -- to say the least, so here I am with all the little details:

I am not going to go through the entire process of downloading and preparing the raspberry SD card from the Raspberry Pi Downloads page. The cool thing with raspberry is that once you get it running for the first time, you get a real Debian Linux that does all you expect a descent OS to do.

A pleasant surprise with the raspberry image was that the default set-up registered itself to my dynamic DNS and I was able to log into raspberrypi the moment I plugged it into my LAN without touching a thing.

The first thing that I needed to do was change the hostname of the device. That way there would be no name conflicts when I add a fresh one for the next God knows what project that will come up...

Changing the host name is as simple as editing the file /etc/hostname, changing the single line with the word raspeberrypi to xena (Yes i wanted an ... epic name) and then rebooting. The DNS picked up the name change and logging into xina was as easy as typing ssh -l pi xena -X. (An even easier way to accomplish the task is to use raspi-config. Check the advanced options menu)

Next thing would be a plug the USB disk and make sure it gets mounted every time the system boots. I suppose that the proper way to make this work would be to tamper with /etc/fstab. I chose to do it a bit differently and ended up creating a file containing the last things that the system should do right after booting.

First create a mount point and mount the USB disk. In my case, I created /mnt/SFTP-Data and tested it with a:
mount /dev/sda1 /mnt/STFP-Data

The idea with executing commands right after boot is that we need to create a file, let's call it system-startup.sh that contains the above mount command, plua the necessary LSB comments, place it in /etc/init.d, make it executable and then run insserv to add this command as the last default runlevel action. The format of the comments section is :

#! /bin/sh
### BEGIN INIT INFO
# Provides: system-start.sh
# Required-Start: $remote_fs $syslog
# Required-Stop: $remote_fs $syslog
# Default-Start: 2 3 4 5
# Default-Stop: 0 1 6
# Short-Description: Start up script after boot
# Description: Enable service provided by daemon.
### END INIT INFO
mount /dev/sda1 /mnt/STFP-Data

...and the actual command to make this work is:
sudo insserv /etc/init.d/system-startup.sh

Finally, it time to install and configure Samba. The Debian Administrator's handbook says it all. Just remember that raspebrry-pi only has 256MB of actual RAM so keep away from web configuration tools like swat and go with the debconf and manually editing the the smb.conf file option.

After Samba is up and running edit the file /etc/samba/smb.conf and fix the basic staff like work group name and server description. Mine looks like this:

[global]
## Browsing/Identification ###

# Change this to the workgroup/NT-domain name your Samba server will part of
   workgroup = aryballos

# server string is the equivalent of the NT Description field
   server string = %h Raspberry-PI Server

# Windows Internet Name Serving Support Section:
# WINS Support - Tells the NMBD component of Samba to enable its WINS Server
  wins support = yes

In order to create a read write share that anyone can use, we need to create a new user that has read/write access to the disk and then force that use and group everytime that someone accesses data through the Samba share.

pi@xena /etc/samba $ groupadd microsoft
pi@xena /etc/samba $ useradd -c "Samba user" -m -d /mnt/mdz-disk/shared/ -g microsoft bill

There are two things here. First Bill does not have a password so he can not log in interactively. Second Bill's home is the directory on the disk where I want everybody to have full read/write access. Telling this to the Samba server requires that the following section be placed at the end of the smb.comf file ...

[public]
   comment = Public data in the USB drive for our work-group
   read only = no
   path = /mnt//mnt/STFP-Data/public
   guest ok = yes
   force user = bill
   force group = microsoft

... the directory is made and permissions are set

pi@xena /mnt/SFTP-Data $ sudo mkdir public
pi@xena /mnt/SFTP-Data $ sudo chown bill.microsoft public/

... and finally the samba service is restarted...

pi@xena /etc/samba $ sudo service samba restart
[ ok ] Stopping Samba daemons: nmbd smbd.
[ ok ] Starting Samba daemons: nmbd smbd.
pi@xena /etc/samba $ 

Thursday, 18 October 2012

PHP: Workaround for the mailbox is empty imap error

If you are in the process of learning how to use the PHP imap* family of functions in order to manage a remote mailbox, here is a little hint to let you get away with the first annoying error warning you are likely to run into.

So here is how the story goes. You open am empty mailbox. Do something with it and then when you close it you get a PHP warning like :

Notice (8): Unknown: Mailbox is empty (errflg=1) [Unknown, line ??]

I have read many ways for handling this. The bottom line is that this is only a warning and due to the nature of the PHP imap functions, it will eventually be flashed when you call imap_close() or when your script exits. Fortunately each call to imap_errors() flashes the internal error log, so a simple way to avoid the entire hassle would be to code something like ...

    function connect()
    {
        $mailBoxx = @imap_open($this->server, $this->username, $this->password);

        if ($mailBox) {
            // call this to avoid the mailbox is empty error message
            if (imap_num_msg($mailBox) == 0)
                $errors = imap_errors();
            return TRUE;
        }
        // imap_errors() will contain the list of real errors
        return FALSE;
    }

Sunday, 15 April 2012

bash scrupt to copy all songs in an m3u list into a folder

This is not the first time I thought about it and it took a lot of digging and googling in order to get the right command line to do it. So, all credit goes to the thefekete.net who is the initial poster and my only contribution is turning the initial command line into a script.

#!/bin/bash

# ------------------------------------------------------------------------------------
# Copy all files from a playlist to a dest folder
# ------------------------------------------------------------------------------------
if [ "$#" != 2 ]; then
 echo usage $0 playlist.m3u dest-dir
 exit 1
fi

if [ ! -d "$2" ]; then
    mkdir $2
    echo Creating directory `pwd`"/"$2
fi

if [ -z "$1" ]; then
 echo  $1 is not a valid file
 exit 2
fi

cat "$1" | grep -v '#' | while read i; do cp "${i}" "$2" ; echo "${i}"; done

Thank you the thefekete

Friday, 17 February 2012

CakePHP: Loosing translated texts

This one drove me crazy for the last couple of hours, so I thought I better share it right away.

I have a bilingual CakePHP application that displays content messages translated from English to Greek. To achieve this I wrap all my English texts inside cake's __() function and then run the cake i18n extract script in order to assemble a .pot file. Finally, I translate my original messages to Greek using the POEdit program to create and manage the necessary translations. Everything seemed to work well: Each time I added new strings, I would execute the cake i18n extract script, then open POEdit, update my .po catalogue from the generated .pot file and translate only the new texts.

Except for today. I was asked to asked to add a few more messages, so I followed the standard procedure. but after I updated both my .po and .mo files, the messages on the web page remained in English despite my ... sincere efforts and honest desire to see them in Greek.

It took me a while to figure this out: The solution was as simple as to delete all files from the APP/tmp/cache/persistent directory.

Wednesday, 15 February 2012

Command line to mount USB flash drives in Linux

The subject is not new and nothing beats the device notifier icon in KDE asking you what to do with a newly inserted flash drive. This post however, is meant to serve only as a note to me, regarding the safest procedure of setting up and mounting a flash drive from the command line.

The current state of affairs is like this: We have a 32GB flash drive that is to be plugged in to a remote LAMP server where we want to place daily database backups. We only have access to the server via ssh so in order to automate the procedure, we are going to initially format the drive using the ext4 file system and then label it so that we won't care about the actual SCSI port that he device will use in the future.

Initial formatting and labelling

After the device has been plugged in for the first time, the easiest way to determine the actual SCSI port is to find the lines containing the word SCSI in the kernel displayed messages. This is as easy as :

[root@skymnos ~]# dmesg | grep SCSI
SCSI subsystem initialized
Block layer SCSI generic (bsg) driver version 0.4 loaded (major 252)
scsi0 : SCSI emulation for USB Mass Storage devices
sd 1:0:0:0: [sdb] Attached SCSI disk
sd 0:0:0:0: [sda] Attached SCSI removable disk
[root@skymnos ~]# 

Alternatively we could use the udisks --monitor command before pluggin in the device. This would produce output like the following:

[root@skymnos-wifi ~]# udisks --monitor
Monitoring activity from the disks daemon. Press Ctrl+C to cancel.
added:     /org/freedesktop/UDisks/devices/sde
added:     /org/freedesktop/UDisks/devices/sde1
So now we know that out flush drive is located under /dev/sda and the partition that we are going to work with is /dev/sda1. To format it we will use the mkfs.ext4 command with the -L option to specify a label for our file-system.

[root@skymnos ~]# mkfs.ext4 -L dbBackups /dev/sda1 
mke2fs 1.41.12 (17-May-2010)
Filesystem label=dbBackups
OS type: Linux
Block size=4096 (log=2)
Fragment size=4096 (log=2)
Stride=0 blocks, Stripe width=0 blocks
1949696 inodes, 7790336 blocks
389516 blocks (5.00%) reserved for the super user
First data block=0
Maximum filesystem blocks=0
238 block groups
32768 blocks per group, 32768 fragments per group
8192 inodes per group
Superblock backups stored on blocks: 
        32768, 98304, 163840, 229376, 294912, 819200, 884736, 1605632, 2654208, 
        4096000

Writing inode tables: done                            
Creating journal (32768 blocks): done
Writing superblocks and filesystem accounting information: done

This filesystem will be automatically checked every 39 mounts or
180 days, whichever comes first.  Use tune2fs -c or -i to override.
[root@skymnos ~]# 

Mounting

The -L dbBackups switch that we previously used in order to format the drive, tells mkfs to create a file system with a label of dbBackups. Now if you plug this to a system running a decent window manager with udev, this would be automatically mounted under /media/dbBackups. We are going the mimic the same behaviour.

[root@skymnos ~]# mkdir /media/dbBackups/
[root@skymnos ~]# mount -L dbBackups /media/dbBackups/
[root@skymnos ~]# df -h /media/dbBackups
Filesystem            Size  Used Avail Use% Mounted on
/dev/sda1              30G  172M   28G   1% /media/dbBackups
[root@skymnos ~]# 

A few more details: Since this is going to be backup storage disk, our lives will become much easier if we create a directory with full read-write permissions inside the drive like this:

[root@skymnos ~]# mkdir /media/dbBackups/data
[root@skymnos ~]# chmod o+w /media/dbBackups/data/
[root@skymnos ~]# 

So to sum it up. Mounting the flash drive on the remote server from my office machine requires -- well, apart from having someone plug the drive into a USB port doing something like this:

[thanassis@skymnos ~]$ sudo mount -L dbBackups /media/dbBackups/
[thanassis@skymnos-wifi ~]$ df -h
Filesystem            Size  Used Avail Use% Mounted on
/dev/sda1              68G  5.1G   62G   8% /
tmpfs                1006M   88K 1006M   1% /dev/shm
/dev/sdb1              30G  172M   28G   1% /media/dbBackups
[thanassis@skymnos ~]$ 

And what if I wanted the system to attempt to mount the drive each time it boots? In that case all I would have to do is add a line like /bin/mount -L dbBackups /media/dbBackups/ in the /etc/rc.d/rc.local file

Tuesday, 13 December 2011

Java enums: A complete example

I started programming with Pascal, so I have deep feelings for enumerated types. To be honest I feel that they are a much more easy going approach to modeling that the long lists of constants we used in the C programming language or in the pre JDK5 versions of Java.

Java enums are so very flexible and the guide on the Oracle website says it all. What I wanted to do in this post is to provide a full working example, as a reference to myself and hopefully any ... lost soul, that demonstrates how to bind data with each enum type value and also how to implement the previous and next methods,

package gr.abakalidis.sample.model;

/**
 * Possible image states and relative sizes regarding the actual bitmaps
 * loaded from a Web server.
 * 
 * @author Thanassis Bakalidis
 * @version 1.0
 */
public enum ImageState {
    NOT_LOADED(0, 0), SMALL(320, 240), MEDIUM(800, 600), LARGE(1024, 768);

    private final int width;
    private final int height;

    ImageState(int width, int height)
    {
        this.width = width;
        this.height = height;
    }

    public int getHeight()
    {
        return this.height;
    }

    public int getWidth()
    {
        return this.width;
    }

    /**
     * Get the next value ion the series of enumeration 
     * 
     * @return the next value in the series or null if already at end of values
     */
    public ImageState getNext()
    {
        return this.ordinal() < ImageState.values().length - 1 
            ? ImageState.values()[this.ordinal() + 1] 
            : null;
    }
 
    /**
     * Get the previous value in the series of enumeration
     * 
     * @return the next value in the series on null if called for the first va;ue 
     */
    public ImageState getPrevious()
    {
        return this.ordinal() == 0 
            ? null 
            : ImageState.values()[this.ordinal() - 1];
    }
}

Tuesday, 15 November 2011

CentOS: Specifying DDNS hostname

A quick reminder. When using a CentOS machine on network with a DDNS then in order for the host name to appear correctly on the DDNS managed local zones, create or edit the file /etc/sysconfig/network-scripts/ifcfg-deviceID where deviceID is the actual device name of your network interface e.g. eth0, wlan0 etc. Make sure that the line DHCP_HOSTNAME appears as shown below

DEVICE="eth0"
NM_CONTROLLED="yes"
DHCP_HOSTNAME="my-machine"
NAME="System eth0"
BROADCAST=255.255.255.255
ONBOOT=yes

There can be one ifcfg-XXX file per network interface. That way you can have two different names for the same machine connecting to the same network using different network cards like Ethernet and Wi-fi.

Saturday, 5 November 2011

CakePHP: Storing multi-dimentional arrays in cookies

II didn't know that cookies are basically plain text data. This makes it impossible to store complex data structures directly inside a cookie. More information can be found in the archives of the CakePHP google group following this link.

The bottom line is that complex data need to be serialized before being saved in a cookie and unserialized after they are read from one. The serialize() and unserialize() PHP functions are here to do the job and last but not least the third parameter of the Cookie::write call -- the one that instructs cake to encrypt the cookie data -- should be set to true.

So to save a controller's form data you need to write something like this:

    $dataToSave = serialize($this->data);
    $this->Cookie->write( self::SEARCH_DATA_KEY, $dataToSave, true, '1 year');

and to read them back ....

        if (empty($this->data)) {
            // try to see if we have a stored cookie
            $cookieData = $this->Cookie->read(self::SEARCH_DATA_KEY);                        
            if (empty($cookieData)) {
               // provide default values here 
               ...
            } else 
                $this->data = unserialize($cookieData);            
        }

Tuesday, 1 November 2011

CakePHP: An edit form with a cancel button (1.3 and 2.x)

When developing database CRUD applications with CakePHP, sooner or later you end up writing view code looking more or less like this
<div class="my model form">
<?php echo $this->Form->create('MyModel');?>
 <fieldset>
  <legend></legend>
 <?php
  echo $this->Form->input('id');
  echo $this->Form->input('name');
 ?>
 </fieldset>
<?php echo $this->Form->end(__('Submit', true));?>
</div>
This creates a nice form with a submit button at the end that every self respecting user can press to create a new record or modify the data of an existing one. It is also logical that you place a link to the index page somewhere near the form, so your users know where to go in case they change their mind about altering the database data.
With my users this time is was different. The form had to contain a cancel button. So how does one do it? If you are using the cake bake script and wish to have two nice round green buttons right at the bottom of your form then replace the last two lines of the previous code fragment with the following:
     ...
     <div class="submit">
         <?php echo $this->Form->submit(__('Submit', true), array('name' => 'ok', 'div' => false)); ?>
         <?php echo $this->Form->submit(__('Cancel', true), array('name' => 'cancel','div' => false)); ?>
     </div>
     </fieldset>                   
 <?php echo $this->Form->end();?>
The next thing to know from inside the controller code, is which button was pressed before the data were posted and that is available inside the 'form' array of the Controller::params property.
So a simple modification like the one on the following code :
        public function edit($id = null)
        {
            if (!$id && empty($this->data)) {
               $this->Session->setFlash(__('Invalid property', true));
               $this->redirect(array('action' => 'index'));
            }
            if (!empty($this->data)) {
                // abort if cancel button was pressed  
                if (isset( $this->params['form']['cancel'])) {
                    $this->Session->setFlash(__('Changes were not saved. User cancelled.', true));
                    $this->redirect( array( 'action' => 'index' ));
                }

                // proceed to save changes as usual
        }
... and everyone is happy.

Edit: Alternatively, if working with CakePHP version 2.4 then the sane info is inside the data array of the controller's request property.
So the previous code gets rewritten like this
        public function edit($id = null)
        {
            if (!$this->MyModel->exists($id)) {
                throw new NotFoundException(__('Invalid record'));
            }
            if ($this->request->is(array( 'post','put'))) {
                if (isset($this->request->data['cancel'])) {
                    $this->Session->setFlash(__('Changes were not saved. User cancelled.'));
                    return $this->redirect( array( 'action' => 'index' ));
                }

                // proceed to save changes as usual
        }
There is one last thing though... the cancel button in your form should also indicate that no form validation should be performed at the browser level. This can be accomplished by setting the 'formnovalidate' key of the Form::input options parameter to TRUE. So the whole cancel button creation tag should now look like this:
        <div class="submit">
            <?php echo $this->Form->submit(__('Create Account'), array('name' => 'ok', 'div' => FALSE)); ?>
            <?php echo $this->Form->submit(__('Cancel'), array('name' => 'cancel', 'formnovalidate' => TRUE, 'div' => FALSE)); ?>
        </div>
    Form->end(); ?>

Wednesday, 19 October 2011

A new version of the CakePHP QBE component

I have just developed and started testing of a new version of my QBE component.

Major changes are that the component now accepts the model name as an initialization parameter, it provides a new ~ X Y operator to implement the between clause and that support for a different search and results page is now more clear.

The code for the component, along with usage details can be found in my GitHub repository available from this link:.

Wednesday, 14 September 2011

ABAP: Check if a customer is blocked for sales support

This is relatively simple, but it's best to keep it here for future use.

FORM check_if_customer_is_blocked USING a_cust_id TYPE kunnr.
 DATA :
   is_blocked TYPE cassd_x.

 SELECT SINGLE cassd
   INTO is_blocked
   FROM kna1
   WHERE kunnr = a_cust_id.

 IF NOT is_blocked IS INITIAL.
   MESSAGE e888(sabapdocu) WITH 'Customer is blocked!'.
 ENDIF.

 SELECT SINGLE cassd
  INTO is_blocked
  FROM knvv
  WHERE kunnr = a_cust_id.

 IF NOT is_blocked IS INITIAL.
   MESSAGE e888(sabapdocu) WITH 'Customer is blocked!'.
 ENDIF.
ENDFORM.

Tuesday, 13 September 2011

Android Development on Fedora 17 Howto

Updated 2012-06-28 The original article was written for and tested on fedora 15. This is the revised version for Fedora 17.

Here are the steps I followed in order to start developing android applications on my Fedora 15 x86_64 box. The actual list is a collection from various sources that I am listing at the end of this post put together in a start-to-finsh manner, so we can start developing almost right away.

Step 1: Install the Sun Java

Download the appropriate rpm for your architecture by visiting the Oracle Java SE Downloads site. Follow this link. Select the latest Java SE 6 Update and download it on your machine.

After download is complete, open a terminal window, cd to your downloads directory and enter the following command :

[thanassis@nb-thanassis Downloads]$ sudo sh jdk-6u27-linux-x64-rpm.bin 

Step 2: Make Sun Java the default Java for your machine

Using the alternatives command -- thanks to Mauriat Miranda -- you may change the default java used by your system like this :

sudo /usr/sbin/alternatives --install /usr/bin/java java /usr/java/default/bin/java 20000

To test, try the following:

[thanassis@nb-thanassis Downloads]$ java -version
java version "1.6.0_27"
Java(TM) SE Runtime Environment (build 1.6.0_27-b07)
Java HotSpot(TM) 64-Bit Server VM (build 20.2-b06, mixed mode)

Step 3: Download and install the Android SDK core support

Start from this page here:

Download the latest android SDK and unpack it in a directory of your choosing. We will need to modify our path variable based on that, so I recommend that you change the base name from android-sdk-linux_x86 to AndrodSDK and move it to /opt.

Next, edit your .bashrc file and modify your path variable to include AndroidSDK/tools and AndroidSDK/platform-tools. The corresponding PATH statement should more or less look like this:

export PATH=$PATH:/opt/AndroidSDK/platform-tools:/opt/AndroidSDK/tools

To start the android emulator on a 64 bit machine we need some additional 32bit packages. These can be installed using the command

sudo yum install glibc.i686 glibc-devel.i686 libstdc++.i686 zlib-devel.i686 ncurses-devel.i686 libX11-devel.i686 libXrender.i686 libXrandr.i686

Step 4: Start the android application, download the SDK files and build a virtual device

Run command /opt/AndroidSDK/tools/android. From the available packages select the SDK version and the documentation for the versions you are planning to work with. Click the install selected button on the right and then accept the license terms and complete the installation of the selected software.

Next create an AVD device. Using the Android SDK manager, click on the Tools menu and then select the Manage AVDs option. Click the New button from the window that pop up and fill in information about the new device

Click create AVD to create your device. After device creation is complete, close the android application and log out and in again to make the paths work.

When you are back in, start the android application directly from a terminal window and start your new device just to be 100% sure that everything works fine.

Step 5: Install eclipse and the ADT plug-in

I do not recommend installing eclipse from the fedora repositories. I have experienced many issues -- especially after updates -- so in my view it is much simpler to download the entire eclipse IDE directly form the downloads page of the eclipse web site, unpack it in a directory of your choosing and finally move it to /opt.

tar -zxvf eclipse-java-juno-linux-gtk-x86_64.tar.gz
sudo mv eclipse /opt/

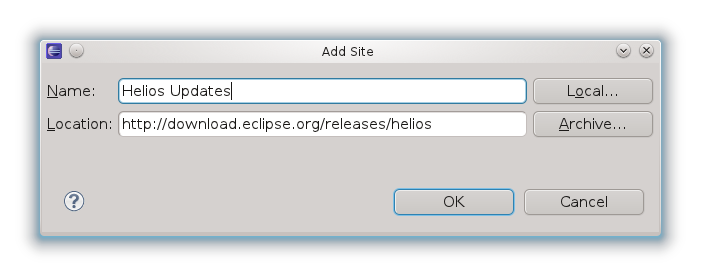
After eclipse is installed on our Linux box we need to install the android development plug-in. This is done by selecting Help → Install new software from the eclipse main window menu. Click the Available software sites link and make sure that the entry http://download.eclipse.org/releases/juno is enabled. Otherwise install it by clicking the add button and create a new software repository like this:

The images shown here are from the previous version of eclipse (Helios). New version images are similar with slight aesthetic differences

While you are there click the add button again, in order to create the android plug in repository. The repo URL is https://dl-ssl.google.com/android/eclipse/ and the add repository window should be filled like this:

Make sure that both repositories are enabled, by activating the check box on the right and press Ok to dismiss the dialog. Now we are ready to perform the actual plug-in installation. Select the ADT plug-in on the Work with field and then check all available software. Click Next accept the license agreement and after download and install is over restart eclipse..

That should be enough to get you started.

Step 6: Create the Hello world application

At this point we shall create a simple hello world application and deploy it first on the android emulator and next to an actual android device connected via USB. Start the eclipse IDE, click File → New → Project and then select Android project from the dialog that pops up. Click next and fill in the Project name and package name fields wth the values HelloWorld and org.example.hello respectively. Click Finish to create the project.

Just to spice up things a bit more, open the res/values/strings.xml file and change the value of the hello string to Hello Android from Fedora. Save the file and run the application; the android emulator will eventually load and the application will be deployed and run on it, so you 'll probably end up seeing something like this:

Step 7: Connect your android device to Linux.

Our last job will be to connect an actual android device to our Linux box and deploy our HelloWorld application onto that device.

Remember that before we connect the actual device we need to change the following settings on the device:

  • Menu Settings → Applications, enable Unknown (or Untrusted) sources.
  • Menu Settings → Applications → Development, enable USB debugging.

The last part comes directly from Peter Kirns blog post. We need to configure Fedora’s udev rules to support our device in debugging mode.

As the super user create or edit the file /etc/udev/rules.d/51-android.rules and place the following line in it:

SUBSYSTEM=="usb",0bb4",SYMLINK+="android_adb",MODE="0666"

The SYSFS{idVendor}=="xxxx" entry must be filled with the USB Vendor ID of your device manufacturer. (the example here assumes you are using HTC). The list of all devices is available from Google's Using Hardware Devices Android Developer's page via this link. There is one last thing though: Vendor Ids must be typed in small letters, although Google's table lists them in capital.

You can even set up your environment to allow connections to multiple devices by adding more than one line in the 51-android.rules file. As an example have a look at my setup that allows me to connect to a Samsung, a Sony Ericson and an HTC device :

[athanassios@hades rules.d]$ cat 51-android.rules 
SUBSYSTEM=="usb",SYSFS{idVendor}=="04e8",SYMLINK+="android_adb",MODE="0666"
SUBSYSTEM=="usb",SYSFS{idVendor}=="0fce",SYMLINK+="android_adb",MODE="0666"
SUBSYSTEM=="usb",SYSFS{idVendor}=="0bb4",SYMLINK+="android_adb",MODE="0666"

Finally, reload rules by using:

udevadm control --reload-rules

Connect your device. In case it prompts for a connection mode specify that it should act as a USB storage unit (disk drive).

Testing connection can be done by using:

[thanassis@nb-thanassis ~]$ adb devices
* daemon not running. starting it now on port 5037 *
* daemon started successfully *
List of devices attached 
SH16ERT01652    device

Start eclipse and run your hello project again. This time the ADT plugin will detect your device deploy your application onto it and you will see the hello world message right onto your android's screen.

Notes

In order to compile this list I used the following links. Thanks and credits go to the original authors.

Monday, 29 August 2011

JDeveloper 10.1.3.4 on CentOS 6 x86_64

Last Thursday I formated my CentOS 5 workstation at work and reinstalled version 6 from scratch. Although we have stopped developing new application with JDeveloper 10.1.x, I still require the old jdev IDE, as existing applications need maintenance and even new features.

Making jdev 10.1.3.4 work on a 64bit Linux is discussed here , n the Darwin-It blog, to whom I own a very big thank you

Finally, I would like to offer my own piece of wisdom to whoever trying to resurrect JDeveloper 10.1 inside a new OS: Keep your paths exactly the same as the previous installation :^)

Monday, 22 August 2011

SELinux and CakePHP on Fedora and CentOS

The first time I installed CakePHP, on a machine with SELinux enabled, I run into two big problems:

  1. Cake was unable to write to the application's tmp directory
  2. Cake was unable to connect tot the database, hosted on an other machine

The first thing that comes to mind, is to disable SELinux completely, and I did more than once :^). This time however, I said to myself that if so many people say SELinux is good, why not give it a try and see if we can both live peacefully on the same machine.

The first thing we need to deal with is allow access to the $APP/tmp directory. This can be accomplished by issuing :

# cd $APP
# chcon -Rv --type=httpd_user_content_rw_t tmp

Next will be to allow httpd to connect to a database hosted on a different machine than the one running the web server in case your setup use different machines for Database and web servers. This is allowed by issuing the following command again as the root user.

setsebool -P httpd_can_network_connect_db 1

For the moment my CakePHP server seems to be running fine. If any problems arise, I will update this post accordingly.

Finally a couple of links on SELinux

How to disable SELinux on Fedora, CentOS and the like

This is only a quick note, on how to disable SELinux on a system using command line tools: Open file /etc/sysconfig/selinux which should more or less be like this:

# This file controls the state of SELinux on the system.
# SELINUX= can take one of these three values:
#       enforcing - SELinux security policy is enforced.
#       permissive - SELinux prints warnings instead of enforcing.
#       disabled - SELinux is fully disabled.
SELINUX=enforcing
# SELINUXTYPE= type of policy in use. Possible values are:
#       targeted - Only targeted network daemons are protected.
#       strict - Full SELinux protection.
SELINUXTYPE=targeted

Next, find the line saying: SELINUX=enforcing and replace it with SELINUX=disabled

save and reboot.

Note: Be very careful when editing this file. the other day. occidentally changed the value of SELINUXTYPE to something other than the allowed values and managed to completely prevent my 6.4 CentOS kernel from booting. (God save the live CD's ...)

Thursday, 11 August 2011

CentOS: Manual IP network configuration

Just installed my first CentOS 6.0 test server. In order to save bandwidth, I downloaded the minimal installation ISO which produced a Linux system that was able to boot correctly, but provided none of the standard system-config-... tools. So in order to continue installation, I had to setup IP information for the systems network card by manually editing files. This is a summary of the steps I followed.

  1. Go to /etc/sysconfig/network-scripts/ and edit file ifcfg-eth0. Then, make sure you provide the following keys
             DEVICE=eth0
             HWADDR=00:1f:29:c3:22:16
             BOOTPROTO=static         
             NM_CONTROLLED=yes
             ONBOOT=yes
             IPADDR=10.5.0.6
             NETMASK=255.255.255.0
         
  2. Open file /etc/sysconfig//network and add information for host name and default gateway like this :
             NETWORKING=yes
             HOSTNAME=barbara.shelman.int
             GATEWAY=10.5.0.1
        
  3. The DNS servers are defined in /etc/resolv.conf. Typically the file looks like this:
             nameserver 10.5.1.1
             nameserver 10.5.1.2
         
  4. Network manager should pick up the changes immediately. In case it does not, restart the netwrok service like this :
             /etc/init.d/network restart
        

This is the minimal setup that worked for me. After I was able to set up my yum proxy and begin installation of CentOS packages, I was able to run system-config-network, which changed many of the previous entries. For example the gateway information in now stored in ifcfg-eth0, along with the DNS information. The previous setup however, is what go me started.

Friday, 5 August 2011

CakePHP The Query by Example Component

After the previous post, regarding how to create and use a input QBE form, here is my simple QBE component.

To use it, paste the following code in a file named qbe.php into your APP/controllers/components directory.

<?php
/**
 * @class QbeComponent
 * Convert posted data entered in a pseudo Query by Example fashion
 * from a CakePHP Form into Model::find() acceptable conditions.
 *
 * @author: Thanassis Bakalidis
 * @version: 1.0
 */
class QbeComponent extends Object {
    // sesion keys for saving and retrieving controller data
    const CONDITIONS_SESSION_KEY = 'SRCH_COND';
    const FORM_DATA_SESSION_KEY = 'SRCH_DATA';

    // supported SQL operators
    private $SQL_OPERATORS = array(
        'IN', '<>', '>=', '<=',
        '>', '<'
    );

    var $owner;     // the controller using the component

    /**
     * @name initialize
     * The initialize method is called before the controller's
     * beforeFilter method.
     */
    function initialize(&$controller, $settings=array())
    {
        $this->owner =& $controller;
    }

    /**
     * @name: getSearchConditions()
     * Return an array to be used as search conditions in a find
     * based on the controller's current data
     * @param : string $modelName name of the model to search controller data
     * @version: 1.3
     */
    function getSearchConditions($modelName = null)
    {
        if ($modelName == null)
            return null;

        // create speciffic keys for the model andcontroller
        $sessionConditionsKey = sprintf("%s-%s-%s",
                                self::CONDITIONS_SESSION_KEY,
                                $this->owner->name,
                                $modelName
                            );
        $sessionDataKey = sprintf("%s-%s-%s",
                                self::FORM_DATA_SESSION_KEY,
                                $this->owner->name,
                                $modelName
                            );

        if (empty($this->owner->data)) {
            // attempt to read conditions from sesion
            $conditions = $this->owner->Session->check($sessionConditionsKey)
                ? $this->owner->Session->read($sessionConditionsKey)
                : array();
            $this->owner->data = $this->owner->Session->check($sessionDataKey)
                ? $this->owner->Session->read($sessionDataKey)
                : array();
        } else {
            // we have posted data. Atempt to rebuild conditons
            // array
            $conditions = array();
            foreach( $this->owner->data[$modelName] as $key => $value) {
                if (empty($value))
                    continue;

                $operator = $this->extractOperator($value);

                if (is_array($value)) {
                    // this can only be a date field

                    $month = $value['month'];
                    $day = $value['day'];
                    $year = $value['year'];

                    // We want all three variables to be numeric so we 'll check their
                    // concatenation. After all PHP numbers as just strings with digits
                    if (is_numeric($month.$day.$year) && checkdate( $month, $day, $year)) {
                        $conditionsKey ="$modelName.$key";
                        $conditionsValue = "$year-$month-$day";
                    } else
                        continue;
                } else {
                    // we have normal input, remove any leading and trailing blanks
                    $value = trim($value);                          
                    // and check the operator given
                    if ($operator === '' && !is_numeric($value)) {
                        // turn '='' to 'LIKE' for non numeric data
                        // numeric data will be treated as if they
                        // have an wquals operator
                        $operator = 'LIKE';
                        $value = str_replace('*', '%',  $value);
                        $value = str_replace('?', '.',  $value);
                    } else if ($operator === 'IN') {
                        // we need to convert the input string to an aray
                        // of the designated values
                        $operator = '';
                        $value = array_filter(explode( ' ', $value));
                    }

                    $conditionsValue = $value;
                    $conditionsKey = "$modelName.$key $operator";
                }

                // add the new condition entry
                $conditions[trim($conditionsKey)] = $conditionsValue;
            }

            // if we have some criteria, add them in the sesion
            $this->owner->Session->write($sessionConditionsKey, $conditions);
            $this->owner->Session->write($sessionDataKey, $this->owner->data);
        }

        return $conditions;
    }

    private function extractOperator(&$input)
    {
        if (is_array($input))
            return '';

        $operator = strtoupper(strtok($input, ' '));

        if (in_array($operator, $this->SQL_OPERATORS)) {
            $opLength = strlen($operator);
            $inputLength = strlen($input);
            $input = trim(substr( $input, $opLength, $inputLength - $opLength));
        } else {
            $operator = '';
        }

        return $operator;
    }
}

Next modify your AppController to use the component by adding 'Qbe' to the $components array. An example would be:

    var $components = array(
        'RequestHandler',
        'Auth',
        'Session',
        'Qbe'
    );

Now crate a query form before the results table into your index view. Copying the form from the corresponding model's create or edit pages is usually enough to get you started.

Finally, modify the corresponding controller method to use the posted data in order to create search conditions. A typical example for a model named Product would be something like that:

    function index()
    {        
        $this->Product->recursive = 0;
        $conditions = $this->Qbe->getSearchConditions($this->Product->name);
        $products = $this->paginate('Product', $conditions);

        $this->set( 'products', $products);
        $this->prepareCombos();
    }

The prepareCombos() method is a simple private function I created by copying all the find)'list', ...) commands that the cake bake script created after the add() and edit() controller methods, so that all foreign key fields have correct value ranges, when the input form gets displayed. For more information and example code, see the previous post which presents the same functionality, by adding code to the AppController.

Tuesday, 28 June 2011

CakePHP: Turn an input form into a query form (Version 2)

CakePHP makes constructing input forms easy. The Form helper object's input() methods provides us with the necessary intelligence, to display and get input data from our users, then store it into the controller's $this->data property using the format required by the framework's Model->save() method, so they can eventually be written to the database, with no need for any elaborate code. Furthermore, given the fact that cake's cake script will bake all that standard code in a flash. it becomes a matter of minutes to create a full featured CRUD application, starting from just a good database design.

One thing I find missing from the baked code, is the ability to create input forms whose data will be used as search criteria -- in a QBE fashion -- in an index or display page. My solution requires us to convert the submitted data into a form that is compatible with the Model->find()'s $conditions parameter and then feed this to the Model->find() or the Controller->paginate() methods in order to limit the number of returned items.

As Richard pointed out during the first version of this post, cake offers the postConditions() method, which does this out of the box and the truth of the matter is that I had completely missed that when I started coding. After looking at the CakePHP code and comparing it with my approach, I can only say that with the code below, you don't have to worry about operators and providing complex parameters. The latest version will allow users to type their desired operator before the value in a QBE like fashion. The standard Cake approach gives more accurate control over the entire process, but I am not sure how to create a UI that will allow users to change operators dynamically .

So, to get started with my alternative version, the typical index() method, for a model named Product, using this approach will have to look somehow like this:

    function index()
    {        
        $this->Product->recursive = 0;
        $conditions = $this->getSearchConditions($this->Product->name);
        $products = $this->paginate('Product', $conditions);

        $this->set( 'products', $products);
        $this->prepareCombos();
    }

The important part here s obviously the $this->getSearchConditions() function that will get the controllers $data property and transform it into the $conditions array. The perfect place to put the code for that would be our application's controller.

class AppController extends Controller {
    const CONDITIONS_SESSION_KEY = 'SRCH_COND';
    const FORM_DATA_SESSION_KEY = 'SRCH_DATA';

    private $SQL_OPERATORS = array(
        'IN', '<>', '>=', '<=',
        '>', '<'        
    );

    /**
     * @name: getSearchConditions()
     * @access: protected
     * @author: Thanassis Bakalidis
     * @param : string $modelName name of the model to search controller data
     * Return an array to be used as search conditions in a Model's find 
     * method based on the controller's current data
     * @version: 1.4
     */
    protected function getSearchConditions($modelName = null)
    {
        if ($modelName == null)
            return null;

        // create speciffic keys for the model andcontroller
        $sessionConditionsKey = sprintf("%s-%s-%s",
                                self::CONDITIONS_SESSION_KEY,
                                $this->name,
                                $modelName
                            );
        $sessionDataKey = sprintf("%s-%s-%s",
                                self::FORM_DATA_SESSION_KEY,
                                $this->name,
                                $modelName
                            );

        if (empty($this->data)) {
            // attempt to read conditions from sesion
            $conditions = $this->Session->check($sessionConditionsKey)
                ? $this->Session->read($sessionConditionsKey)
                : array();
            $this->data = $this->Session->check($sessionDataKey)
                ? $this->Session->read($sessionDataKey)
                : array();
        } else {
            // we have posted data. Atempt to rebuild conditons
            // array
            $conditions = array();
            foreach( $this->data[$modelName] as $key => $value) {
                if (empty($value))
                    continue;

                $operator = $this->extractOperator($value);
                
                if (is_array($value)) {
                    // this can only be a date field

                    $month = $value['month'];
                    $day = $value['day'];
                    $year = $value['year'];

                    // We want all three variables to be numeric so we 'll check their
                    // concatenation. After all PHP numbers as just strings with digits
                    if (is_numeric($month.$day.$year) && checkdate( $month, $day, $year)) {
                        $conditionsKey ="$modelName.$key";
                        $conditionsValue = "$year-$month-$day";
                    } else
                        continue;                        
                } else {
                    // we have normal input check the operator given                    
                    if ($operator == '' && !is_numeric($value)) {
                        // turn '=' to 'LIKE' for non numeric data
                        // numeric data will be treated as if they
                        // have an wquals operator
                        $operator = 'LIKE';
                        $value = str_replace('*', '%',  $value);
                        $value = str_replace('?', '.',  $value);                        
                    } else if ($operator === 'IN') {
                        // we need to convert the input string to an aray
                        // of the designated values
                        $operator = '';
                        $value = array_filter(explode( ' ', $value));
                    } 
                    
                    $conditionsValue = $value;
                    $conditionsKey = "$modelName.$key $operator";                    
                }

                // add the new condition entry
                $conditions[trim($conditionsKey)] = $conditionsValue;
            }

            // if we have some criteria, add them in the sesion
            $this->Session->write($sessionConditionsKey, $conditions);
            $this->Session->write($sessionDataKey, $this->data);
        }

        return $conditions;
    }

    private function extractOperator(&$input)
    {     
        $operator = strtoupper((strtok($input, ' '));
        
        if (in_array($operator, $this->SQL_OPERATORS)) {
            $opLength = strlen($operator);
            $inputLength = strlen($input);
            $input = trim(substr( $input, $opLength, $inputLength - $opLength));                        
        } else {            
            $operator = '';
        }
        
        return $operator;
    }

This was the hard part. The next ones have to do with only copy and paste. So get the form that cake created from your add or edit views and copy it before the table in the index view page. You may possibly wish to remove some unwanted input fields and change the value of the $this->Form->end() function's parameter from "Submit" to "Search".

So we are almost there. One last stroke and we are ready. Remember the $this->prepareCombos(); last comand on the index action? Well, that is a simple private method I created by copying all the find)'list', ...) commands that the cake bake script created after the add() and edit() methods, so that all foreign key fields have correct value ranges, when the input form gets displayed. For my product's controller for example the function looks like this:

    private function prepareCombos()
    {
        $productTypes = $this->Product->ProductType->find('list');
        $productCategories = $this->Product->ProductCategory->find('list');
        $suppliers = $this->Product->Supplier->find(
                                                'list',
                                                array(
                                                    'order' => array(
                                                        'id' => 'asc'
                                                    )
                                                )
                                            );
        $qualities = $this->Product->Quality->find('list');        
        $this->set(compact('productTypes', 'productCategories', 'suppliers', 'qualities'));
    }

Notes

  • In case your model contains validation rules like range then the default input element that the form helper creates , will contain an appropriate maxlength attribute, that will not allow your users to type more than the maximum allowed characters for the field. Say, for example that you have a rule for a field named width, that looks like this
           'width' => array (
                'rule' => array('range', 1, 999),
                'message' => 'Width must be between 1 and 999 mm',
                'last' => true
           )
          
    ... then the actual HTML input element will have a maxlength attribute of 3. This is not going to make your query UI very usable, so make sure that the search form's echo $this->Form->input( ... statement provides an appropriate hardcoded value for maxlength.
  • The next thing to consider, is what will happen when our users provide wrong inputs, say they type =< 13 instead of >= 13. In that case the code -- as it is now -- will create an SQL statement of the form select ... where Model.Field LIKE '=< 13' , that will provide an empty result set, but is still valid SQL. Any workaround for this type of situation would make our code even more complicated than it is now, so I am not going to spend any more thought on this.
  • After going this far, I believe that the next reasonable thing would be to move the functionality into a new component, that will take away all the complexity from the AppController class, but this is probably going to be the subject of a forthcoming post.