Tuesday 13 December 2011

Java enums: A complete example

I started programming with Pascal, so I have deep feelings for enumerated types. To be honest I feel that they are a much more easy going approach to modeling that the long lists of constants we used in the C programming language or in the pre JDK5 versions of Java.

Java enums are so very flexible and the guide on the Oracle website says it all. What I wanted to do in this post is to provide a full working example, as a reference to myself and hopefully any ... lost soul, that demonstrates how to bind data with each enum type value and also how to implement the previous and next methods,

package gr.abakalidis.sample.model;

/**
 * Possible image states and relative sizes regarding the actual bitmaps
 * loaded from a Web server.
 * 
 * @author Thanassis Bakalidis
 * @version 1.0
 */
public enum ImageState {
    NOT_LOADED(0, 0), SMALL(320, 240), MEDIUM(800, 600), LARGE(1024, 768);

    private final int width;
    private final int height;

    ImageState(int width, int height)
    {
        this.width = width;
        this.height = height;
    }

    public int getHeight()
    {
        return this.height;
    }

    public int getWidth()
    {
        return this.width;
    }

    /**
     * Get the next value ion the series of enumeration 
     * 
     * @return the next value in the series or null if already at end of values
     */
    public ImageState getNext()
    {
        return this.ordinal() < ImageState.values().length - 1 
            ? ImageState.values()[this.ordinal() + 1] 
            : null;
    }
 
    /**
     * Get the previous value in the series of enumeration
     * 
     * @return the next value in the series on null if called for the first va;ue 
     */
    public ImageState getPrevious()
    {
        return this.ordinal() == 0 
            ? null 
            : ImageState.values()[this.ordinal() - 1];
    }
}

Tuesday 15 November 2011

CentOS: Specifying DDNS hostname

A quick reminder. When using a CentOS machine on network with a DDNS then in order for the host name to appear correctly on the DDNS managed local zones, create or edit the file /etc/sysconfig/network-scripts/ifcfg-deviceID where deviceID is the actual device name of your network interface e.g. eth0, wlan0 etc. Make sure that the line DHCP_HOSTNAME appears as shown below

DEVICE="eth0"
NM_CONTROLLED="yes"
DHCP_HOSTNAME="my-machine"
NAME="System eth0"
BROADCAST=255.255.255.255
ONBOOT=yes

There can be one ifcfg-XXX file per network interface. That way you can have two different names for the same machine connecting to the same network using different network cards like Ethernet and Wi-fi.

Saturday 5 November 2011

CakePHP: Storing multi-dimentional arrays in cookies

II didn't know that cookies are basically plain text data. This makes it impossible to store complex data structures directly inside a cookie. More information can be found in the archives of the CakePHP google group following this link.

The bottom line is that complex data need to be serialized before being saved in a cookie and unserialized after they are read from one. The serialize() and unserialize() PHP functions are here to do the job and last but not least the third parameter of the Cookie::write call -- the one that instructs cake to encrypt the cookie data -- should be set to true.

So to save a controller's form data you need to write something like this:

    $dataToSave = serialize($this->data);
    $this->Cookie->write( self::SEARCH_DATA_KEY, $dataToSave, true, '1 year');

and to read them back ....

        if (empty($this->data)) {
            // try to see if we have a stored cookie
            $cookieData = $this->Cookie->read(self::SEARCH_DATA_KEY);                        
            if (empty($cookieData)) {
               // provide default values here 
               ...
            } else 
                $this->data = unserialize($cookieData);            
        }

Tuesday 1 November 2011

CakePHP: An edit form with a cancel button (1.3 and 2.x)

When developing database CRUD applications with CakePHP, sooner or later you end up writing view code looking more or less like this
<div class="my model form">
<?php echo $this->Form->create('MyModel');?>
 <fieldset>
  <legend></legend>
 <?php
  echo $this->Form->input('id');
  echo $this->Form->input('name');
 ?>
 </fieldset>
<?php echo $this->Form->end(__('Submit', true));?>
</div>
This creates a nice form with a submit button at the end that every self respecting user can press to create a new record or modify the data of an existing one. It is also logical that you place a link to the index page somewhere near the form, so your users know where to go in case they change their mind about altering the database data.
With my users this time is was different. The form had to contain a cancel button. So how does one do it? If you are using the cake bake script and wish to have two nice round green buttons right at the bottom of your form then replace the last two lines of the previous code fragment with the following:
     ...
     <div class="submit">
         <?php echo $this->Form->submit(__('Submit', true), array('name' => 'ok', 'div' => false)); ?>
         <?php echo $this->Form->submit(__('Cancel', true), array('name' => 'cancel','div' => false)); ?>
     </div>
     </fieldset>                   
 <?php echo $this->Form->end();?>
The next thing to know from inside the controller code, is which button was pressed before the data were posted and that is available inside the 'form' array of the Controller::params property.
So a simple modification like the one on the following code :
        public function edit($id = null)
        {
            if (!$id && empty($this->data)) {
               $this->Session->setFlash(__('Invalid property', true));
               $this->redirect(array('action' => 'index'));
            }
            if (!empty($this->data)) {
                // abort if cancel button was pressed  
                if (isset( $this->params['form']['cancel'])) {
                    $this->Session->setFlash(__('Changes were not saved. User cancelled.', true));
                    $this->redirect( array( 'action' => 'index' ));
                }

                // proceed to save changes as usual
        }
... and everyone is happy.

Edit: Alternatively, if working with CakePHP version 2.4 then the sane info is inside the data array of the controller's request property.
So the previous code gets rewritten like this
        public function edit($id = null)
        {
            if (!$this->MyModel->exists($id)) {
                throw new NotFoundException(__('Invalid record'));
            }
            if ($this->request->is(array( 'post','put'))) {
                if (isset($this->request->data['cancel'])) {
                    $this->Session->setFlash(__('Changes were not saved. User cancelled.'));
                    return $this->redirect( array( 'action' => 'index' ));
                }

                // proceed to save changes as usual
        }
There is one last thing though... the cancel button in your form should also indicate that no form validation should be performed at the browser level. This can be accomplished by setting the 'formnovalidate' key of the Form::input options parameter to TRUE. So the whole cancel button creation tag should now look like this:
        <div class="submit">
            <?php echo $this->Form->submit(__('Create Account'), array('name' => 'ok', 'div' => FALSE)); ?>
            <?php echo $this->Form->submit(__('Cancel'), array('name' => 'cancel', 'formnovalidate' => TRUE, 'div' => FALSE)); ?>
        </div>
    Form->end(); ?>

Wednesday 19 October 2011

A new version of the CakePHP QBE component

I have just developed and started testing of a new version of my QBE component.

Major changes are that the component now accepts the model name as an initialization parameter, it provides a new ~ X Y operator to implement the between clause and that support for a different search and results page is now more clear.

The code for the component, along with usage details can be found in my GitHub repository available from this link:.

Wednesday 14 September 2011

ABAP: Check if a customer is blocked for sales support

This is relatively simple, but it's best to keep it here for future use.

FORM check_if_customer_is_blocked USING a_cust_id TYPE kunnr.
 DATA :
   is_blocked TYPE cassd_x.

 SELECT SINGLE cassd
   INTO is_blocked
   FROM kna1
   WHERE kunnr = a_cust_id.

 IF NOT is_blocked IS INITIAL.
   MESSAGE e888(sabapdocu) WITH 'Customer is blocked!'.
 ENDIF.

 SELECT SINGLE cassd
  INTO is_blocked
  FROM knvv
  WHERE kunnr = a_cust_id.

 IF NOT is_blocked IS INITIAL.
   MESSAGE e888(sabapdocu) WITH 'Customer is blocked!'.
 ENDIF.
ENDFORM.

Tuesday 13 September 2011

Android Development on Fedora 17 Howto

Updated 2012-06-28 The original article was written for and tested on fedora 15. This is the revised version for Fedora 17.

Here are the steps I followed in order to start developing android applications on my Fedora 15 x86_64 box. The actual list is a collection from various sources that I am listing at the end of this post put together in a start-to-finsh manner, so we can start developing almost right away.

Step 1: Install the Sun Java

Download the appropriate rpm for your architecture by visiting the Oracle Java SE Downloads site. Follow this link. Select the latest Java SE 6 Update and download it on your machine.

After download is complete, open a terminal window, cd to your downloads directory and enter the following command :

[thanassis@nb-thanassis Downloads]$ sudo sh jdk-6u27-linux-x64-rpm.bin 

Step 2: Make Sun Java the default Java for your machine

Using the alternatives command -- thanks to Mauriat Miranda -- you may change the default java used by your system like this :

sudo /usr/sbin/alternatives --install /usr/bin/java java /usr/java/default/bin/java 20000

To test, try the following:

[thanassis@nb-thanassis Downloads]$ java -version
java version "1.6.0_27"
Java(TM) SE Runtime Environment (build 1.6.0_27-b07)
Java HotSpot(TM) 64-Bit Server VM (build 20.2-b06, mixed mode)

Step 3: Download and install the Android SDK core support

Start from this page here:

Download the latest android SDK and unpack it in a directory of your choosing. We will need to modify our path variable based on that, so I recommend that you change the base name from android-sdk-linux_x86 to AndrodSDK and move it to /opt.

Next, edit your .bashrc file and modify your path variable to include AndroidSDK/tools and AndroidSDK/platform-tools. The corresponding PATH statement should more or less look like this:

export PATH=$PATH:/opt/AndroidSDK/platform-tools:/opt/AndroidSDK/tools

To start the android emulator on a 64 bit machine we need some additional 32bit packages. These can be installed using the command

sudo yum install glibc.i686 glibc-devel.i686 libstdc++.i686 zlib-devel.i686 ncurses-devel.i686 libX11-devel.i686 libXrender.i686 libXrandr.i686

Step 4: Start the android application, download the SDK files and build a virtual device

Run command /opt/AndroidSDK/tools/android. From the available packages select the SDK version and the documentation for the versions you are planning to work with. Click the install selected button on the right and then accept the license terms and complete the installation of the selected software.

Next create an AVD device. Using the Android SDK manager, click on the Tools menu and then select the Manage AVDs option. Click the New button from the window that pop up and fill in information about the new device

Click create AVD to create your device. After device creation is complete, close the android application and log out and in again to make the paths work.

When you are back in, start the android application directly from a terminal window and start your new device just to be 100% sure that everything works fine.

Step 5: Install eclipse and the ADT plug-in

I do not recommend installing eclipse from the fedora repositories. I have experienced many issues -- especially after updates -- so in my view it is much simpler to download the entire eclipse IDE directly form the downloads page of the eclipse web site, unpack it in a directory of your choosing and finally move it to /opt.

tar -zxvf eclipse-java-juno-linux-gtk-x86_64.tar.gz
sudo mv eclipse /opt/

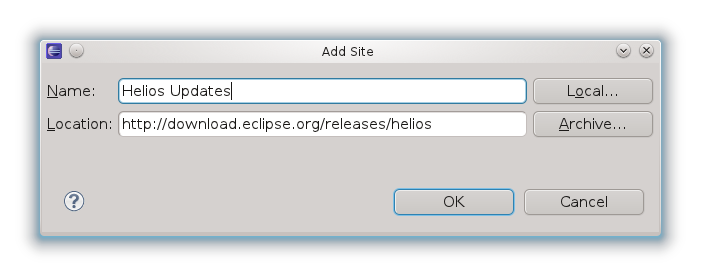
After eclipse is installed on our Linux box we need to install the android development plug-in. This is done by selecting Help → Install new software from the eclipse main window menu. Click the Available software sites link and make sure that the entry http://download.eclipse.org/releases/juno is enabled. Otherwise install it by clicking the add button and create a new software repository like this:

The images shown here are from the previous version of eclipse (Helios). New version images are similar with slight aesthetic differences

While you are there click the add button again, in order to create the android plug in repository. The repo URL is https://dl-ssl.google.com/android/eclipse/ and the add repository window should be filled like this:

Make sure that both repositories are enabled, by activating the check box on the right and press Ok to dismiss the dialog. Now we are ready to perform the actual plug-in installation. Select the ADT plug-in on the Work with field and then check all available software. Click Next accept the license agreement and after download and install is over restart eclipse..

That should be enough to get you started.

Step 6: Create the Hello world application

At this point we shall create a simple hello world application and deploy it first on the android emulator and next to an actual android device connected via USB. Start the eclipse IDE, click File → New → Project and then select Android project from the dialog that pops up. Click next and fill in the Project name and package name fields wth the values HelloWorld and org.example.hello respectively. Click Finish to create the project.

Just to spice up things a bit more, open the res/values/strings.xml file and change the value of the hello string to Hello Android from Fedora. Save the file and run the application; the android emulator will eventually load and the application will be deployed and run on it, so you 'll probably end up seeing something like this:

Step 7: Connect your android device to Linux.

Our last job will be to connect an actual android device to our Linux box and deploy our HelloWorld application onto that device.

Remember that before we connect the actual device we need to change the following settings on the device:

  • Menu Settings → Applications, enable Unknown (or Untrusted) sources.
  • Menu Settings → Applications → Development, enable USB debugging.

The last part comes directly from Peter Kirns blog post. We need to configure Fedora’s udev rules to support our device in debugging mode.

As the super user create or edit the file /etc/udev/rules.d/51-android.rules and place the following line in it:

SUBSYSTEM=="usb",0bb4",SYMLINK+="android_adb",MODE="0666"

The SYSFS{idVendor}=="xxxx" entry must be filled with the USB Vendor ID of your device manufacturer. (the example here assumes you are using HTC). The list of all devices is available from Google's Using Hardware Devices Android Developer's page via this link. There is one last thing though: Vendor Ids must be typed in small letters, although Google's table lists them in capital.

You can even set up your environment to allow connections to multiple devices by adding more than one line in the 51-android.rules file. As an example have a look at my setup that allows me to connect to a Samsung, a Sony Ericson and an HTC device :

[athanassios@hades rules.d]$ cat 51-android.rules 
SUBSYSTEM=="usb",SYSFS{idVendor}=="04e8",SYMLINK+="android_adb",MODE="0666"
SUBSYSTEM=="usb",SYSFS{idVendor}=="0fce",SYMLINK+="android_adb",MODE="0666"
SUBSYSTEM=="usb",SYSFS{idVendor}=="0bb4",SYMLINK+="android_adb",MODE="0666"

Finally, reload rules by using:

udevadm control --reload-rules

Connect your device. In case it prompts for a connection mode specify that it should act as a USB storage unit (disk drive).

Testing connection can be done by using:

[thanassis@nb-thanassis ~]$ adb devices
* daemon not running. starting it now on port 5037 *
* daemon started successfully *
List of devices attached 
SH16ERT01652    device

Start eclipse and run your hello project again. This time the ADT plugin will detect your device deploy your application onto it and you will see the hello world message right onto your android's screen.

Notes

In order to compile this list I used the following links. Thanks and credits go to the original authors.

Monday 29 August 2011

JDeveloper 10.1.3.4 on CentOS 6 x86_64

Last Thursday I formated my CentOS 5 workstation at work and reinstalled version 6 from scratch. Although we have stopped developing new application with JDeveloper 10.1.x, I still require the old jdev IDE, as existing applications need maintenance and even new features.

Making jdev 10.1.3.4 work on a 64bit Linux is discussed here , n the Darwin-It blog, to whom I own a very big thank you

Finally, I would like to offer my own piece of wisdom to whoever trying to resurrect JDeveloper 10.1 inside a new OS: Keep your paths exactly the same as the previous installation :^)

Monday 22 August 2011

SELinux and CakePHP on Fedora and CentOS

The first time I installed CakePHP, on a machine with SELinux enabled, I run into two big problems:

  1. Cake was unable to write to the application's tmp directory
  2. Cake was unable to connect tot the database, hosted on an other machine

The first thing that comes to mind, is to disable SELinux completely, and I did more than once :^). This time however, I said to myself that if so many people say SELinux is good, why not give it a try and see if we can both live peacefully on the same machine.

The first thing we need to deal with is allow access to the $APP/tmp directory. This can be accomplished by issuing :

# cd $APP
# chcon -Rv --type=httpd_user_content_rw_t tmp

Next will be to allow httpd to connect to a database hosted on a different machine than the one running the web server in case your setup use different machines for Database and web servers. This is allowed by issuing the following command again as the root user.

setsebool -P httpd_can_network_connect_db 1

For the moment my CakePHP server seems to be running fine. If any problems arise, I will update this post accordingly.

Finally a couple of links on SELinux

How to disable SELinux on Fedora, CentOS and the like

This is only a quick note, on how to disable SELinux on a system using command line tools: Open file /etc/sysconfig/selinux which should more or less be like this:

# This file controls the state of SELinux on the system.
# SELINUX= can take one of these three values:
#       enforcing - SELinux security policy is enforced.
#       permissive - SELinux prints warnings instead of enforcing.
#       disabled - SELinux is fully disabled.
SELINUX=enforcing
# SELINUXTYPE= type of policy in use. Possible values are:
#       targeted - Only targeted network daemons are protected.
#       strict - Full SELinux protection.
SELINUXTYPE=targeted

Next, find the line saying: SELINUX=enforcing and replace it with SELINUX=disabled

save and reboot.

Note: Be very careful when editing this file. the other day. occidentally changed the value of SELINUXTYPE to something other than the allowed values and managed to completely prevent my 6.4 CentOS kernel from booting. (God save the live CD's ...)

Thursday 11 August 2011

CentOS: Manual IP network configuration

Just installed my first CentOS 6.0 test server. In order to save bandwidth, I downloaded the minimal installation ISO which produced a Linux system that was able to boot correctly, but provided none of the standard system-config-... tools. So in order to continue installation, I had to setup IP information for the systems network card by manually editing files. This is a summary of the steps I followed.

  1. Go to /etc/sysconfig/network-scripts/ and edit file ifcfg-eth0. Then, make sure you provide the following keys
             DEVICE=eth0
             HWADDR=00:1f:29:c3:22:16
             BOOTPROTO=static         
             NM_CONTROLLED=yes
             ONBOOT=yes
             IPADDR=10.5.0.6
             NETMASK=255.255.255.0
         
  2. Open file /etc/sysconfig//network and add information for host name and default gateway like this :
             NETWORKING=yes
             HOSTNAME=barbara.shelman.int
             GATEWAY=10.5.0.1
        
  3. The DNS servers are defined in /etc/resolv.conf. Typically the file looks like this:
             nameserver 10.5.1.1
             nameserver 10.5.1.2
         
  4. Network manager should pick up the changes immediately. In case it does not, restart the netwrok service like this :
             /etc/init.d/network restart
        

This is the minimal setup that worked for me. After I was able to set up my yum proxy and begin installation of CentOS packages, I was able to run system-config-network, which changed many of the previous entries. For example the gateway information in now stored in ifcfg-eth0, along with the DNS information. The previous setup however, is what go me started.

Friday 5 August 2011

CakePHP The Query by Example Component

After the previous post, regarding how to create and use a input QBE form, here is my simple QBE component.

To use it, paste the following code in a file named qbe.php into your APP/controllers/components directory.

<?php
/**
 * @class QbeComponent
 * Convert posted data entered in a pseudo Query by Example fashion
 * from a CakePHP Form into Model::find() acceptable conditions.
 *
 * @author: Thanassis Bakalidis
 * @version: 1.0
 */
class QbeComponent extends Object {
    // sesion keys for saving and retrieving controller data
    const CONDITIONS_SESSION_KEY = 'SRCH_COND';
    const FORM_DATA_SESSION_KEY = 'SRCH_DATA';

    // supported SQL operators
    private $SQL_OPERATORS = array(
        'IN', '<>', '>=', '<=',
        '>', '<'
    );

    var $owner;     // the controller using the component

    /**
     * @name initialize
     * The initialize method is called before the controller's
     * beforeFilter method.
     */
    function initialize(&$controller, $settings=array())
    {
        $this->owner =& $controller;
    }

    /**
     * @name: getSearchConditions()
     * Return an array to be used as search conditions in a find
     * based on the controller's current data
     * @param : string $modelName name of the model to search controller data
     * @version: 1.3
     */
    function getSearchConditions($modelName = null)
    {
        if ($modelName == null)
            return null;

        // create speciffic keys for the model andcontroller
        $sessionConditionsKey = sprintf("%s-%s-%s",
                                self::CONDITIONS_SESSION_KEY,
                                $this->owner->name,
                                $modelName
                            );
        $sessionDataKey = sprintf("%s-%s-%s",
                                self::FORM_DATA_SESSION_KEY,
                                $this->owner->name,
                                $modelName
                            );

        if (empty($this->owner->data)) {
            // attempt to read conditions from sesion
            $conditions = $this->owner->Session->check($sessionConditionsKey)
                ? $this->owner->Session->read($sessionConditionsKey)
                : array();
            $this->owner->data = $this->owner->Session->check($sessionDataKey)
                ? $this->owner->Session->read($sessionDataKey)
                : array();
        } else {
            // we have posted data. Atempt to rebuild conditons
            // array
            $conditions = array();
            foreach( $this->owner->data[$modelName] as $key => $value) {
                if (empty($value))
                    continue;

                $operator = $this->extractOperator($value);

                if (is_array($value)) {
                    // this can only be a date field

                    $month = $value['month'];
                    $day = $value['day'];
                    $year = $value['year'];

                    // We want all three variables to be numeric so we 'll check their
                    // concatenation. After all PHP numbers as just strings with digits
                    if (is_numeric($month.$day.$year) && checkdate( $month, $day, $year)) {
                        $conditionsKey ="$modelName.$key";
                        $conditionsValue = "$year-$month-$day";
                    } else
                        continue;
                } else {
                    // we have normal input, remove any leading and trailing blanks
                    $value = trim($value);                          
                    // and check the operator given
                    if ($operator === '' && !is_numeric($value)) {
                        // turn '='' to 'LIKE' for non numeric data
                        // numeric data will be treated as if they
                        // have an wquals operator
                        $operator = 'LIKE';
                        $value = str_replace('*', '%',  $value);
                        $value = str_replace('?', '.',  $value);
                    } else if ($operator === 'IN') {
                        // we need to convert the input string to an aray
                        // of the designated values
                        $operator = '';
                        $value = array_filter(explode( ' ', $value));
                    }

                    $conditionsValue = $value;
                    $conditionsKey = "$modelName.$key $operator";
                }

                // add the new condition entry
                $conditions[trim($conditionsKey)] = $conditionsValue;
            }

            // if we have some criteria, add them in the sesion
            $this->owner->Session->write($sessionConditionsKey, $conditions);
            $this->owner->Session->write($sessionDataKey, $this->owner->data);
        }

        return $conditions;
    }

    private function extractOperator(&$input)
    {
        if (is_array($input))
            return '';

        $operator = strtoupper(strtok($input, ' '));

        if (in_array($operator, $this->SQL_OPERATORS)) {
            $opLength = strlen($operator);
            $inputLength = strlen($input);
            $input = trim(substr( $input, $opLength, $inputLength - $opLength));
        } else {
            $operator = '';
        }

        return $operator;
    }
}

Next modify your AppController to use the component by adding 'Qbe' to the $components array. An example would be:

    var $components = array(
        'RequestHandler',
        'Auth',
        'Session',
        'Qbe'
    );

Now crate a query form before the results table into your index view. Copying the form from the corresponding model's create or edit pages is usually enough to get you started.

Finally, modify the corresponding controller method to use the posted data in order to create search conditions. A typical example for a model named Product would be something like that:

    function index()
    {        
        $this->Product->recursive = 0;
        $conditions = $this->Qbe->getSearchConditions($this->Product->name);
        $products = $this->paginate('Product', $conditions);

        $this->set( 'products', $products);
        $this->prepareCombos();
    }

The prepareCombos() method is a simple private function I created by copying all the find)'list', ...) commands that the cake bake script created after the add() and edit() controller methods, so that all foreign key fields have correct value ranges, when the input form gets displayed. For more information and example code, see the previous post which presents the same functionality, by adding code to the AppController.

Tuesday 28 June 2011

CakePHP: Turn an input form into a query form (Version 2)

CakePHP makes constructing input forms easy. The Form helper object's input() methods provides us with the necessary intelligence, to display and get input data from our users, then store it into the controller's $this->data property using the format required by the framework's Model->save() method, so they can eventually be written to the database, with no need for any elaborate code. Furthermore, given the fact that cake's cake script will bake all that standard code in a flash. it becomes a matter of minutes to create a full featured CRUD application, starting from just a good database design.

One thing I find missing from the baked code, is the ability to create input forms whose data will be used as search criteria -- in a QBE fashion -- in an index or display page. My solution requires us to convert the submitted data into a form that is compatible with the Model->find()'s $conditions parameter and then feed this to the Model->find() or the Controller->paginate() methods in order to limit the number of returned items.

As Richard pointed out during the first version of this post, cake offers the postConditions() method, which does this out of the box and the truth of the matter is that I had completely missed that when I started coding. After looking at the CakePHP code and comparing it with my approach, I can only say that with the code below, you don't have to worry about operators and providing complex parameters. The latest version will allow users to type their desired operator before the value in a QBE like fashion. The standard Cake approach gives more accurate control over the entire process, but I am not sure how to create a UI that will allow users to change operators dynamically .

So, to get started with my alternative version, the typical index() method, for a model named Product, using this approach will have to look somehow like this:

    function index()
    {        
        $this->Product->recursive = 0;
        $conditions = $this->getSearchConditions($this->Product->name);
        $products = $this->paginate('Product', $conditions);

        $this->set( 'products', $products);
        $this->prepareCombos();
    }

The important part here s obviously the $this->getSearchConditions() function that will get the controllers $data property and transform it into the $conditions array. The perfect place to put the code for that would be our application's controller.

class AppController extends Controller {
    const CONDITIONS_SESSION_KEY = 'SRCH_COND';
    const FORM_DATA_SESSION_KEY = 'SRCH_DATA';

    private $SQL_OPERATORS = array(
        'IN', '<>', '>=', '<=',
        '>', '<'        
    );

    /**
     * @name: getSearchConditions()
     * @access: protected
     * @author: Thanassis Bakalidis
     * @param : string $modelName name of the model to search controller data
     * Return an array to be used as search conditions in a Model's find 
     * method based on the controller's current data
     * @version: 1.4
     */
    protected function getSearchConditions($modelName = null)
    {
        if ($modelName == null)
            return null;

        // create speciffic keys for the model andcontroller
        $sessionConditionsKey = sprintf("%s-%s-%s",
                                self::CONDITIONS_SESSION_KEY,
                                $this->name,
                                $modelName
                            );
        $sessionDataKey = sprintf("%s-%s-%s",
                                self::FORM_DATA_SESSION_KEY,
                                $this->name,
                                $modelName
                            );

        if (empty($this->data)) {
            // attempt to read conditions from sesion
            $conditions = $this->Session->check($sessionConditionsKey)
                ? $this->Session->read($sessionConditionsKey)
                : array();
            $this->data = $this->Session->check($sessionDataKey)
                ? $this->Session->read($sessionDataKey)
                : array();
        } else {
            // we have posted data. Atempt to rebuild conditons
            // array
            $conditions = array();
            foreach( $this->data[$modelName] as $key => $value) {
                if (empty($value))
                    continue;

                $operator = $this->extractOperator($value);
                
                if (is_array($value)) {
                    // this can only be a date field

                    $month = $value['month'];
                    $day = $value['day'];
                    $year = $value['year'];

                    // We want all three variables to be numeric so we 'll check their
                    // concatenation. After all PHP numbers as just strings with digits
                    if (is_numeric($month.$day.$year) && checkdate( $month, $day, $year)) {
                        $conditionsKey ="$modelName.$key";
                        $conditionsValue = "$year-$month-$day";
                    } else
                        continue;                        
                } else {
                    // we have normal input check the operator given                    
                    if ($operator == '' && !is_numeric($value)) {
                        // turn '=' to 'LIKE' for non numeric data
                        // numeric data will be treated as if they
                        // have an wquals operator
                        $operator = 'LIKE';
                        $value = str_replace('*', '%',  $value);
                        $value = str_replace('?', '.',  $value);                        
                    } else if ($operator === 'IN') {
                        // we need to convert the input string to an aray
                        // of the designated values
                        $operator = '';
                        $value = array_filter(explode( ' ', $value));
                    } 
                    
                    $conditionsValue = $value;
                    $conditionsKey = "$modelName.$key $operator";                    
                }

                // add the new condition entry
                $conditions[trim($conditionsKey)] = $conditionsValue;
            }

            // if we have some criteria, add them in the sesion
            $this->Session->write($sessionConditionsKey, $conditions);
            $this->Session->write($sessionDataKey, $this->data);
        }

        return $conditions;
    }

    private function extractOperator(&$input)
    {     
        $operator = strtoupper((strtok($input, ' '));
        
        if (in_array($operator, $this->SQL_OPERATORS)) {
            $opLength = strlen($operator);
            $inputLength = strlen($input);
            $input = trim(substr( $input, $opLength, $inputLength - $opLength));                        
        } else {            
            $operator = '';
        }
        
        return $operator;
    }

This was the hard part. The next ones have to do with only copy and paste. So get the form that cake created from your add or edit views and copy it before the table in the index view page. You may possibly wish to remove some unwanted input fields and change the value of the $this->Form->end() function's parameter from "Submit" to "Search".

So we are almost there. One last stroke and we are ready. Remember the $this->prepareCombos(); last comand on the index action? Well, that is a simple private method I created by copying all the find)'list', ...) commands that the cake bake script created after the add() and edit() methods, so that all foreign key fields have correct value ranges, when the input form gets displayed. For my product's controller for example the function looks like this:

    private function prepareCombos()
    {
        $productTypes = $this->Product->ProductType->find('list');
        $productCategories = $this->Product->ProductCategory->find('list');
        $suppliers = $this->Product->Supplier->find(
                                                'list',
                                                array(
                                                    'order' => array(
                                                        'id' => 'asc'
                                                    )
                                                )
                                            );
        $qualities = $this->Product->Quality->find('list');        
        $this->set(compact('productTypes', 'productCategories', 'suppliers', 'qualities'));
    }

Notes

  • In case your model contains validation rules like range then the default input element that the form helper creates , will contain an appropriate maxlength attribute, that will not allow your users to type more than the maximum allowed characters for the field. Say, for example that you have a rule for a field named width, that looks like this
           'width' => array (
                'rule' => array('range', 1, 999),
                'message' => 'Width must be between 1 and 999 mm',
                'last' => true
           )
          
    ... then the actual HTML input element will have a maxlength attribute of 3. This is not going to make your query UI very usable, so make sure that the search form's echo $this->Form->input( ... statement provides an appropriate hardcoded value for maxlength.
  • The next thing to consider, is what will happen when our users provide wrong inputs, say they type =< 13 instead of >= 13. In that case the code -- as it is now -- will create an SQL statement of the form select ... where Model.Field LIKE '=< 13' , that will provide an empty result set, but is still valid SQL. Any workaround for this type of situation would make our code even more complicated than it is now, so I am not going to spend any more thought on this.
  • After going this far, I believe that the next reasonable thing would be to move the functionality into a new component, that will take away all the complexity from the AppController class, but this is probably going to be the subject of a forthcoming post.

Tuesday 7 June 2011

CakePHP: Authenticating against Microsoft Active Directory

My work environment uses Windows. Everyone logs on to an Active Directory based domain and this is how security is managed. When you have web applications running on Linux and you need some sort of authentication service, then you can either implement your own user data store or you can use an exiting. The good news is that MS AD is actually an LDAPv3 server, so getting data to and from LDAP is not that difficult in the world of both PHP and Cake.

The following "howto" will list the steps I followed in order to perform authentication from the company's Windows 2003 servers. I will also explain one approach for deciding how to grant users admin privileges on a CakePHP application based on membership of a Windows user group. Many might argue that I am oversimplifying, but I believe that on most occasions, this will be more than adequate.

In order to get started, remember that building an authentication system on a CakePHP application starts with creating a User model. Only difference will be here that the model in question will not get its data from an ordinary database table, but rather from an LDAP data source.

Get the LDAP datasource component

So this brings as to the first issue, which is: Get a datasource to read LDAP data. Fortunately the bakery has just what we need. The actual article that contains the code I am still using is this.

Analogrithems, however, the author of the datasource code, is providing new updates on github accessible via this link. The truth is that I have yet to test the new version, so if you are to follow the tutorial better stick with the one in the bakery.

No matter the version you choose you will end up with a file named ldap_source.php, that you will need to place in your APP/models/datasources/ directory.

Set up a connection using the new datasource

The next thing that needs to be done is to create a new connection that will use the new datasource. Open APP/config/database.php and add a new entry looking more or less like this

    var $ldap = array (
        'datasource' => 'ldap',
         // list of active directory hosts
        'host' => array(
                    'ldap1.example.com',
                    'ldap2.example.com',
                    'ldap3.example.com'
                ),
        'port' => 389,
         // location (root) in LDAP tree to start searching 
        'basedn' => 'DC=example,DC=com',
         // user to authenticate on AD server with
        'login' => 'cn=LDAPBindUser,cn=Users,dc=example,dc=com',
        'password' => 'abABa@332',
        'database' => '',
        'tls'      => false,
        'version'  => 3
    );

Verify with your network administrator that LDAPBindUser in created on the correct OU and that the base DN is correct, according to where you placed the user account. (Needless to say that the user must have next to no privileges at all)

Set up the User model class

The next step is our user model. This should be like any model, you have except that it will be based on the $ldap database config, its primary key will be the LDAP dn attribute and that it will need no table.

class User extends AppModel {
    var $name = 'User';
    var $useDbConfig = 'ldap';

    var $primaryKey = 'dn';
    var $useTable = '';

    /**
     * return true if the userName is a member of the groupName
     * Active Directory group
     */
    function isMemberOf($userName, $groupName)
    {
        // trivial check for valid names
        if (empty($userName) || empty($groupName))
            return false;

        // locate the user record
        $userData = $this->find('first',
                                array(
                                    'conditions' => array(
                                        'samaccountname' => $userName
                                    )
                                )
                            );
        // no user by that name exists
        if (empty($userData))
            return false;

        // check if the userin question belongs to any groups
        if (!isset($userData['User']['memberof']))
            return false;

        // search all groups that our user if a meber
        $groups = $userData['User']['memberof'];
        foreach( $groups as $index => $group)
            if (strpos( $group, $groupName) != false)
                return true;

        return false;
    }
}

We have also added a member function which allows us to determine if a user-name belongs to an Active directory group that will be very handy when checking for application privileges later on.

Set up the LdapAuth Component

And finally the "auth" part. The standard CakePHP Auth component will not work for us so we need a specialized version that thanks to analogthemes again is accessible from his web site through here. Just place ldap_auth.php to your APP/controllers/components/ directory and change your AppController so that it uses LdapAuth.

This however is not enough. There is one little thing that needs to be changed in the LdapAuth code, so that authenticating in AD works: Locate the login() function in line 153 of ldao_auth.php and change line 156 so that it looks like this:

     ...

     function login($uid, $password) {
        $this->__setDefaults();
        $this->_loggedIn = false;
        // $dn = $this->getDn('uid', $uid);
        $dn = $this->getDn('samaccountname', $uid);
        $loginResult = $this->ldapauth($dn, $password); 
        ...

My simple approach to security says that an application has two types of users. Readers (i.e. everyone) and writers (admins only). We set the administrative users to be the members of a specific group in the active directory server. That way our application controller looks like this :

class AppController extends Controller {
    const ADMIN_KEY  = 'myApp-Admin';
    const AUTH_GROUP = 'MyApp-Admins';

    var $components = array('RequestHandler', 'LdapAuth', 'Session');
    var $helpers = array(
                        'Form', 'Html', 'Locale', 'Session',
                        'Js' => array('Jquery')
                    );
    var $isAdmin;

    function beforeFilter()
    {
        // pr($this->referer());
        $this->isAdmin = false;
        $this->LdapAuth->authorize = 'controller';
        $this->LdapAuth->allowedActions = array(
                                            'index',
                                            'view',
                                            'details'
                                        );

        $this->LdapAuth->loginError = "Invalid credentials";
        $this->LdapAuth->authError  = "Not authorized!";

        $userInfo = $this->LdapAuth->user();

        if (!empty($userInfo)) {
            $user = $userInfo['User'];
            // setup display username and user's full name
            $this->set('loggedInUser', $user['samaccountname']);
            $this->set('loggedInFullName', $user['cn']);

            // if we already have the admin role stored in the session
            if ($this->Session->check(self::ADMIN_KEY))
                $this->isAdmin = $this->Session->read(self::ADMIN_KEY);
            else {
                // determine the admin role from wheither the current 
                // user is a member of the AUTH group
                $this->LoadModel('User');
                $this->isAdmin = $this->User->isMemberOf(
                                                $user['samaccountname'],
                                                self::AUTH_GROUP);
                $this->Session->write(self::ADMIN_KEY, $this->isAdmin);
            }
        } else {
            $this->Session->delete(self::ADMIN_KEY);
        }

        $this->set('admin', $this->isAdmin);
    }

    function isAuthorized()
    {
        // Only administrators have access to the CUD actions
        if ($this->action == 'delete' ||
            $this->action == 'edit' ||
            $this->action == 'add')
          return $this->isAdmin;

        return true;                
    }
}

That way, everyone can access our view, details and index actions of all the application controllers, but will need to enter the user name and password of an ADMIN_GROUP member to gain access to the rest of our controller methods. This tutorial however is has gone long enough. To finish it, please remember to create your user controller and you login user view ...

Thursday 2 June 2011

C and UTF-8 data in Linux

During the last few days, I found myself struggling to create a PHP extension what would allow PHP to convert common characters between Greek and Latin, so that typed codes would for instance, always use the same version of 'A' no matter the language that the user keyboard is switched to. You see whether you type a Latin 'A' (U+0041) or a Greek 'Α' (U+0391) the two letters appear to be the same despite the difference in their internal representation. The same applies to other common letters like 'E', 'P' and 'Y'

I reckoned that this conversion and translation of characters based on their position on some given string would be an excellent chance to remember string pointers from my student C days, so I set out to create a library with functions called latinToGreek() and greekToLatin() that would do the conversion and return the new string.

Like most people in similar positions, I tried googling for C and Unicode howtos and run into some very good articles but nothing was in the form of a recipe that I could follow. I did read many of them and managed to get the work done. The basic idea here is that since UTF-8 uses a variable number of bytes per character, we need to convert UTF-8 strings into wchat_t strings, then process them like they were ordinary constant length null terminated character arrays and finally convert them back to UTF-8 single byte character strings in order for them to display correctly.

Following is the check list of things to do before actually playing with UTF-8 encoded Unicode.

  1. Use setlocale to set the current program locale to something that supports UTF-8. For example 'en_US.UTF-8' is just fine.
    Bear in mind, that the default locale for C programs in the "C" locale and unless you set the locale correctly nothing will work as expected.
  2. Read your input using normal char[] arrays. Just make sure that hey are big enough. Remember that UTF-8, uses one, two or even more bytes per individual character, so a logical guess would be to allocate an array at least twice the size of your maximum anticipated input.
    Do not forget that good old strlen() will still give you the size of your input in bytes, but not in characters.
  3. Convert multibyte input to wchar_t[] input in order to perform any processing. Remember that wchar_t constants need to be prefixed by an L, so '\0' is now L'\0'.
    Functions mbstowcs and wcstombs can be used to perform the conversion to and from.
  4. Perform your processing as you would ordinarily do using wchat_t data and wchar_t speciffic functions. For example toupper() for wchar_t is now towupper().
  5. Convert your data back to multibyte format using wcstombs and return them to the user.

... and that's about it.

Tuesday 17 May 2011

CakePHP and FreeTDS on CentOS 5

We are almost finished with a project using CakePHP 1.3.8 running on a CentOS 5 box that accesses a Microsoft SQL Server 2008 database, using PHP 5.3.6-4 and the freetds driver, all available from Remi's repository.

This is a report of all the little problems we faced and the solutions we came up with :

  1. The first thing that hit us, was he encoding of the saved data. Although we used NVARCHAR columns for all character fields, we ended up seeing gibberish inside the SQL Server Management Studio, whenever we had to enter anything that was not Latin. Both the server and the application are using UTF-8 locales and data entered via Cake would be returned correctly, however there was no way to get the MSSQL Management Studio to display UTF-8 data.
    After some dispute about whether or not to leave things as they are we decided to utilize a behavior that converted data to and from different character sets before storing and retrieving them from the database. The relevant post from back 2009 is accessible via the following link.
    This approach kept almost everyone happy.
  2. Second issue was the length of the Model's visual fields. I have blogged about this a few days ago and it turns out that the maximum number of characters allowed to a virtual field name is 14.
  3. And finally the stored procedure issue. Up until now, we have been unable to properly call a T-SQL stored procedure using mssql_init() and mssql-bind(). The only workarround for doing the job is to use the mssql_query() function and execute an "EXEC ... " query.
    The code we use -- as a Model method -- is more or less like this :
        /**
         * Execute the T-SQL stored procedure named "dbo.storedProcName"
         * and return execution status.
         *
         * NOTE: if the stored proc uses the T-SQL RAISERROR statement
         *       to trigger some sort of error condition, then
         *       mssql_query still returns true but the 
         *       mssql_get_last_message() will contain the actual error
         *       text that will be returned to the caller.
         */
        function callStoredProc($procParam, &$errorMessage = '')
        {
            // get the low level database connection from the model data
            $conn = $this->getDataSource()->connection;

            // execute a query that calls the stored proc
            $sqlResult = mssql_query(
                          " EXEC dbo.storedProcName
                            @procParam = $procParam;",
                          $conn
                        );

            $errorMessage = mssql_get_last_message();
                
            if ($sqlResult == false) {
                // something went wrong 
                $result = false;              
            } else {                    
                // stay on the safe side            
                if (is_resource($sqlResult))
                    mssql_free_result($sqlResult);
                // if the stored procedure error message is empty then all
                // is well
                $result = $errorMessage == '' ? true : false;
            }

            // return success
            return $result;
        }

As always, I try to update the list if anything new comes up.

Tuesday 3 May 2011

CakePHP: Dynamicaly disabling links

Sometimes we get buried so deeply into ... nuclear science that we forget that after all CakePHP is just PHP, the resulting pages are just HTML and you don't need JQuery to disable a link. Setting it's onlick event to return false, usually does it.

The problem was simple: Given a list of records, (arrivals) selectively enable an action link for each record, (create a purchase order in our case). based on a record attribute (that is whether the purchase order has already been created).

Now, that is now so hard. Well, if you already have something like :

<?php echo $this->Html->link(
                    $this->Html->image('actions/upload.png'),
                    array(
                          'action' => 'createPurchasOorder',
                          $arrival['Arrival']['id']
                    ),
                    array(
                      'escape' => false,
                      'title' => 'Create purchase order for the arrival.'
                    )
                ); ?> 

inside a PHP foreach loop, then it's not that difficult to transform it into :

<?php 
         $canCreatePO = empty($arrival['Arrival']['purchase_order_code']);
         echo $this->Html->link(
                    $this->Html->image('actions/upload.png'),
                    array(
                          'action' => 'createPurchasOorder',
                          $arrival['Arrival']['id']
                    ),
                    array(
                      'escape' => false,
                      'onclick' => $canCreatePO 
                              ? 'return true;'
                              : 'return false',
                      'title' => $canCreatePO 
                              ? 'Create purchase order for the arrival.'
                              : 'Purchase order has already been created.'
                    )
                ); ?> 

So, why the hell did it take me an entire morning to figure this out....

Thursday 21 April 2011

CakePHP: Length of a virtual field's name

Perhaps the fact that I am accessing an MS SQL 2008 server from Linux using the freetds driver could be the cause of my troubles.

What I did find out today, is that when using the $virualFields property of a model the size of the virtual field's name, cannot exceed 14 characters.

My setup here is: CakePHP 1.3.8, running on CentOS 5.6 x86_64 using PHP 5.3.6-3 from Remi's repository.

And here is my case: My Model looks pretty much like this

class ArrivalPackage extends AppModel {
 var $name = 'ArrivalPackage';
 var $belongsTo = array('Arrival', 'Product', 'PackageType');
 var $hasMany = 'PackageLine';

 var $virtualFields = array(
   'reserved_date_gr' => 'CONVERT(NVARCHAR(10), ArrivalPackage.reserved_date, 105)',  //  not good 
   'loaded_date_gr'   => 'CONVERT(NVARCHAR(10), ArrivalPackage.loaded_date, 105)',
   'sold_date_gr'     => 'CONVERT(NVARCHAR(10), ArrivalPackage.sold_date, 105)'
 );
}

After I baked a view and controller for PackageLines I added a pr($packageLine); on the top of my view.ctp view file. The result was :

Array
(
    [ArrivalPackage] => Array
        (
            [id] => 3
            [arrival_id] => 3
            [product_id] => C2ΕLΙLΤ075000000075DULW4
            [supplier_package_number] => 345345345
            [shelman_package_number] => 1099228
            [SSCC] => 
            [min_length] => 2600
            [max_length] => 2600
            [package_type_id] => 1
            [expected_m3] => 0
            [total_pcs] => 20
            [total_m3] => 0.015
            [total_m] => 2
            [loaded] => 0
            [sold] => 1
            [reserved] => 1
            [loaded_date] => 
            [sold_date] => 2011-04-21
            [reserved_date] => 2011-04-18
            [reserved_user] =>  
            [loaded_date_gr] => 
            [sold_date_gr] => 21-04-2011
        )
    
    [0] => Array
        (
            [ArrivalPackage__reserved_date_] => 18-04-2011
        )
    
)

Only after I shortened the name of the reserved_date_gr field to rsvd_date_gr, did I get my expected

Array
(
    [ArrivalPackage] => Array
        (
            [id] => 3
            [arrival_id] => 3
            [product_id] => C2ΕLΙLΤ075000000075DULW4
            [supplier_package_number] => 345345345
            [shelman_package_number] => 1099228
            [SSCC] => 
            [min_length] => 2600
            [max_length] => 2600
            [package_type_id] => 1
            [expected_m3] => 0
            [total_pcs] => 20
            [total_m3] => 0.015
            [total_m] => 2
            [loaded] => 0
            [sold] => 1
            [reserved] => 1
            [loaded_date] => 
            [sold_date] => 2011-04-21
            [reserved_date] => 2011-04-18
            [reserved_user] =>  
            [resvd_date_gr] => 18-04-2011
            [loaded_date_gr] => 
            [sold_date_gr] => 21-04-2011
        )
)

Funny thing is that the actual sql statement produced by Cake, no matter what you name the field is valid for SQL Server, still unless the field name becomes smaller than 14 characters things don't work as you would expect them.

Tuesday 19 April 2011

CakePHP: Storing paging info in the Session

Warning: This post applies to CakePHP 1.3. If you are using CakePHP 2, then visit the updated version available through here.

There is no way you can miss it. Sooner or later you 'll end up having baked your controllers and views only to discover that when you edit a record from the 4th page and press submit on the edit page, much to your annoyance you end up on page one. Needless to say that whatever sort order was there is now gone with the wind.

I have googled a bit and found out the following article in Stack Overflow. The solutions provided over there seemed rather complicated to me, so I decided to craft my own.

Now here is the deal: From what I have seen in cake 1.3, paging is controlled by the value of three parameters: page, sort and direction. All we need to do is provide a way to store them in the session and then have the controller's redirect method inject these back into the URL parameters when they are not present.

<?php
     
class AppController extends Controller {
    const SESSION_KEY = 'PagingInfo.%s.%s';
        
    public $components = array('Session');            

    protected function savePagingInfo()
    {
        // create an array to hold the paging info
        $argsToSave = array();

        // remove paging info from passed args
        foreach( $this->passedArgs as $key => $value)
            if ($key == 'page' || $key == 'sort' || $key == 'direction')
                $argsToSave[$key] = $value;

        // abort if any paging info was found
        $sessionKey = $this->buildSessionKey();
        if (!empty($argsToSave)) {
            $this->Session->write( $sessionKey, $argsToSave);
            return;
        }
        
        // no paging info let's see if we have something in the sesion
        if ($this->Session->check($sessionKey)) {
                $pagingInfo = $this->Session->read($sessionKey);
                $this->passedArgs = array_merge( $this->passedArgs, $pagingInfo);
        }
    }
                        
    private function buildSessionKey($action = NULL)
    {
        if (empty($action))
            $action = $this->action;
            
        return sprintf( self::SESSION_KEY, $this->name, $action);
    }
}
     
?>    

This approach may be simplistic but in my case it worked. All I had to was call $this->savePagingInfo(); from my index() action and then let the rest of the baked code do its work.

Note

And one last comment, there are many cases that you need paging during display of master detail record sets. In cases like these savePagingInfo() will save paging status for the detail records matching the current master and when the master changes, the paging in the session becomes invalid. My simple solution to this is to add a 'page' => 1 entry in the $url params pointing to a master record change. With the design of the application I am currently working on this proves just good enough.